Hi All,
This article is intended for those who want to use OR Have to Use web services with SSL.
In this Post we will discuss how to configure same with a Non Qualified Name SSL Certificate. I will come back with Second part of this article asap where we would see how to create a Qualified Name SSL Certificate.
 This article is based on the request of some of my Blog Readers who were unable to use Web Services.
The Article should only be used for Testing Environment, For Production Environment please contact the Certifying authority to get the SSL Certificate.
Here is What is Article Contain (Table Of Index) -


In a production environment, you obtain an SSL certificate from a certification authority. Some large organizations may have their own certification authorities, and other organizations can request a certificate from a third-party organization.


2.In the Open box, type mmc, and then choose OK.
3.On the File menu, choose Add/Remove Snap-in.
4.In the Add/Remove Snap-in dialog box, choose Certificates, and then choose Add.
5.In the Certificates snap-in dialog box, choose Computer account, and then choose Next.
6.In the Select Computer dialog box, choose Local computer, and then choose Finish.
7.In the Add/Remove Snap-in dialog box, choose OK.


2. In the center pane, right-click the certificate
that you imported, choose All Tasks, and then
choose Manage Private Keys.


This article is intended for those who want to use OR Have to Use web services with SSL.
In this Post we will discuss how to configure same with a Non Qualified Name SSL Certificate. I will come back with Second part of this article asap where we would see how to create a Qualified Name SSL Certificate.

The Article should only be used for Testing Environment, For Production Environment please contact the Certifying authority to get the SSL Certificate.
Here is What is Article Contain (Table Of Index) -
- Pre-Requisites
- Story before This
- Configuring Microsoft Dynamics NAV Web Services to Use SSL (Non-Qualified)
- Creating an SSL Certificate.
- Installing of SSL Certificate
- Configuring the Access Control List and the Web Services Port for SSL
- Verifying the Configuration and Execute the Web Services
Pre-Requisites -
NAV 2013 R2 with W1 Database.
Navision Service Tier Named as NAV_DEMO With Port No.6666, 7777, 8888 & 9999.
Navision Service Tier is configured with NAV User Password. (NOT Mandatory)
Story before This -
With NAV 2013 & NAV 2013 R2 we had configured the NAV User Password Credential type. Below are the Post Links for Same.
After doing this change the SSL Boolean on Web services have been set to True and we were unable to use the web services (ODATA and SOAP) with NAV 2013 & NAV 2013 R2.
In this article we will see how we can use SSL Enabled Web Services with Non-Qualified SSL Certificate.
You can use these certificates shared at the End of the article for your test environment.
Configuring Microsoft Dynamics NAV Web Services to Use SSL (Non-Qualified)
The first step is to prepare Microsoft Dynamics NAV to use SSL. This involves configuring the relevant Microsoft Dynamics NAV Server instance to specify SSL.
You can configure Microsoft Dynamics NAV Server instances with the Microsoft Dynamics NAV Server Administration Tool or Microsoft Dynamics NAV Windows PowerShell Cmdlets.
If you are using the windows credential you can set the SSL Enable at service tier by enabling Boolean as highlighted below.

If you are using the Credential type as NAV UserPasword then it will be enabled by Default as shown below.

Creating an SSL Certificate.
3.1 Introduction
-----------------------------------------------------------------------------------------------------------------
The certificate is a file that Microsoft Dynamics NAV Server uses to prove its identity and establish a trusted connection with the client that is trying to connect.
In a production environment, you obtain an SSL certificate from a certification authority. Some large organizations may have their own certification authorities, and other organizations can request a certificate from a third-party organization.
In a test environment, if you do not have certificate, then you can create your own test certificate by using the makecert.exe tool as described in the following procedure.
In the following procedure, we will create a test certificate file (.cer) with a private key file (.pvk), and then generate a personal information file (.pfx) from the two files.
We will use the .pxf in the next procedure for importing the certificate on the computer running Microsoft Dynamics NAV Server.
-----------------------------------------------------------------------------------------------------------------
On the computer that is installed with Microsoft Visual Studio 2012.
Create a folder called My SSL Certificates for working with and storing certificates. I will create the Folder in C Drive.

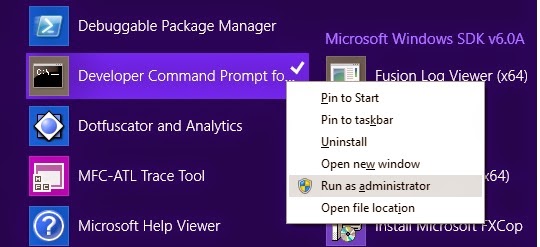
Choose the Start button, choose All Programs.
Choose Microsoft Visual Studio, choose Visual Studio Tools, and then right-click Visual Studio Command Prompt and choose Run as Administrator.

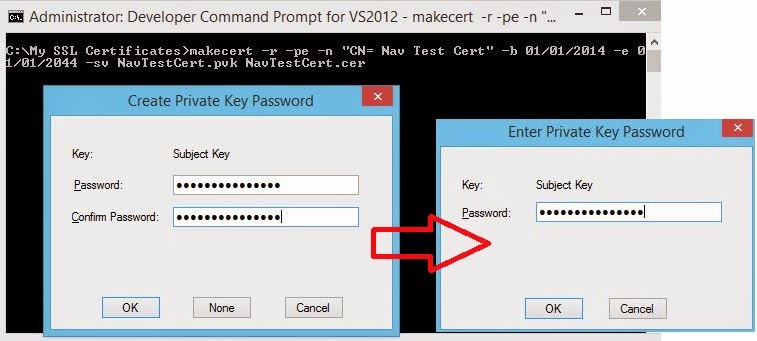
At the command prompt, change to the folder that you created for the certificates. For example, type cd C:\My SSL Certificates, and then press Enter.
To create the SSL certificate with a private key file, we have to use below format command -
-----------------------------------------------------------------------------------------------------------------
makecert -r -pe -n "CN= Nav Test Cert" -b 01/01/2014 -e 01/01/2044 -sv certifiatename.pvk certifiatename.cer
-----------------------------------------------------------------------------------------------------------------
There are two things to Note in above command that you should change based on your requirement.
Parameter
|
Meaning
|
-b 01/01/2014 -e 01/01/2044
|
Validity
Period of The Certificate
|
certifiatename
|
Name of
Certificate
|
I will Name My Certificate as - NavTestCert.
So my command to be executed is (Command 1)–
--------------------------------------------------------------------------------------------------------------------------
makecert -r -pe -n "CN= Nav Test Cert" -b 01/01/2014 -e 01/01/2044 -sv NavTestCert.pvk NavTestCert.cer
--------------------------------------------------------------------------------------------------------------------------
It will ask you for the password twice. My Password is = sslcertificate1.
--------------------------------------------------------------------------------------------------------------------------
makecert -r -pe -n "CN= Nav Test Cert" -b 01/01/2014 -e 01/01/2044 -sv NavTestCert.pvk NavTestCert.cer
--------------------------------------------------------------------------------------------------------------------------
It will ask you for the password twice. My Password is = sslcertificate1.

Let’s check the Folder Content. My Folder have following
files.

Next we Need a PFX File.
To generate a personal information exchange (.pfx) file from the NavTestCert.cer and NavTestCert.pvk files, type the following command.
Substitute sslcertificate1 with your own password.
So my Command to be executed is (Command 2)–
--------------------------------------------------------------------------------------------------------------------------
pvk2pfx -pvk NavTestCert.pvk -spc NavTestCert.cer -pfx NavTestCert.pfx -po sslcertificate1
--------------------------------------------------------------------------------------------------------------------------

Let’s check the Folder Content again. My Folder have
following files.

Installing of SSL Certificate
If you are working on the computer running Microsoft Dynamics NAV Server, you can use the following command to create and install the certificate, so you can skip the next Section 4.1 for importing the certificate.
So my Command to be executed is (Command 3)–
-----------------------------------------------------------------------------------------------------------------------
makecert -r -pe -n "CN=NavTestCert" -b 01/01/2014 -e 01/01/2044 -ss my -sr localmachine -sky exchange
-----------------------------------------------------------------------------------------------------------------------
If you are not working on the computer running Microsoft Dynamics NAV Server, then copy all the files to the Microsoft Dynamics NAV Server computer.
So my Command to be executed is (Command 3)–
-----------------------------------------------------------------------------------------------------------------------
makecert -r -pe -n "CN=NavTestCert" -b 01/01/2014 -e 01/01/2044 -ss my -sr localmachine -sky exchange
-----------------------------------------------------------------------------------------------------------------------
To import an SSL certificate into the local computer store
1.On the computer running Microsoft Dynamics NAV Server, choose Start, and then choose Run.2.In the Open box, type mmc, and then choose OK.
3.On the File menu, choose Add/Remove Snap-in.
4.In the Add/Remove Snap-in dialog box, choose Certificates, and then choose Add.
5.In the Certificates snap-in dialog box, choose Computer account, and then choose Next.
6.In the Select Computer dialog box, choose Local computer, and then choose Finish.
7.In the Add/Remove Snap-in dialog box, choose OK.

8.In the left pane of the console, double-click and expand the Certificates (Local Computer).
9.Right-click Personal, point to All Tasks, and then choose Import.
10.On the Welcome to the Certificate Import Wizard page, choose Next.
11.On the File to Import page, choose Browse, locate your certificate file, for example NavTestCert.pfx.
If the certificate is in a personal information exchange file (.pfx), set the box next to File name to Personal Information Exchange (*.pfx;*.p12), and then browse for the certificate file.
12.Select the certificate file, and then choose Open, and then choose Next.
13.If prompted for a password, type the password on the Password page, and then choose Next.
14.On the Certificate Store page, choose Place all certificates in the following store, and then choose Next.
15.Choose Finish, and then choose OK to confirm that the import was successful.

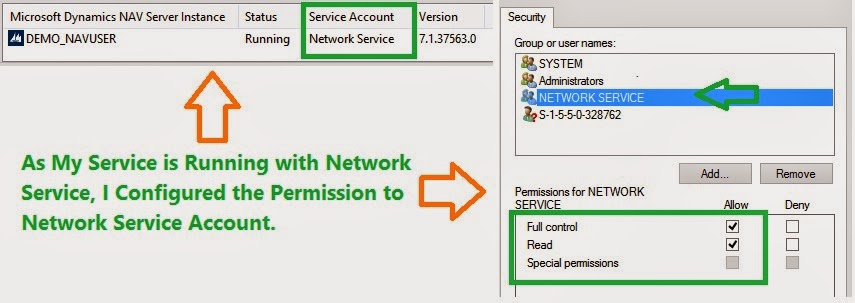
Grant access to the certificate’s private key to the service account for NAV Server
If
the certificate has a private key, then you must give the service account of
Microsoft Dynamics NAV Server access to the private key.
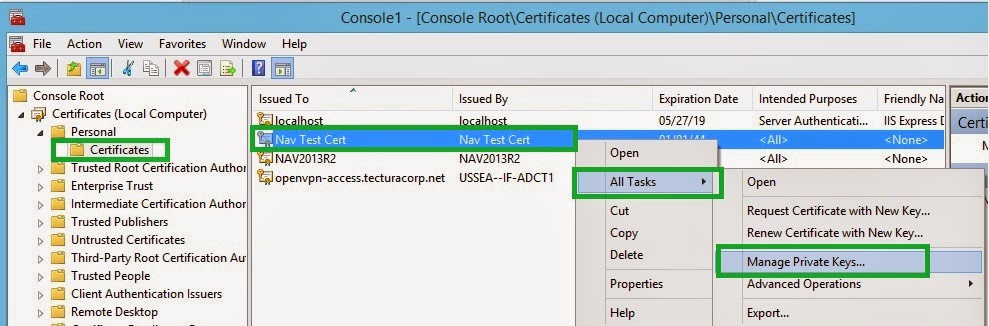
1. In the left pane of MMC, expand the Certificates
(Local Computer) node,
expand the Personal node, and then choose the Certificates folder.

3. In the Permissions for private keys dialog box, choose Add.
4. In the Select Users, Computers, Service Accounts, or Groups dialog box, in the Enter the object names to select box, type the name of the service account for Microsoft Dynamics NAV Server, and then choose OK.
5. On the Security tab, under Allow, select Full Control and Read, and then choose OK.

Obtain the certificate's thumbprint.
1. In the left pane under Console Root, expand the Certificates (Local Computer) node, expand the Personal folder, and then choose the Certificates folder. The center pane displays all the certificates.
2. Right-click the certificate that you imported, and then choose Open.
3. In the Certificate dialog box, choose the Details tab.
4. Scroll through the list of fields, and then choose Thumbprint.

5.Copy the hexadecimal characters from the box, and then paste them in a text editor, such as Notepad. These characters make up the thumbprint.
6.In the text editor, delete all spaces from the thumbprint string.
My Certificate Thumbprint is – 00 89 ce 78 66 1e 72 c8 12 13 bb c6 af 77 ca 80 ce 01 47 a8
The Value that I will Use - 0089ce78661e72c81213bbc6af77ca80ce0147a8
7. Keep the file open or save it. we will use the thumbprint (without Spaces) later on.
Configuring the Access Control List and the Web Services Port for SSL
On the computer running Microsoft Dynamics NAV Server, open a command prompt as an administrator as follows:
1.Run Command Prompt as Administrator.
2.Change to the Windows\System32 directory using ==> cd\Windows\System32
3.To view the ACL for the web services ports to determine if any entries are already using the relevant host name and port, type the following command:
-----------------------------------------------------------------------------------------------
netsh http show urlacl
-----------------------------------------------------------------------------------------------
4.Each entry is listed by the Reserved URL field, which has the format
http://hostname:port. hostname
is the name of the computer running the service and port is the port number the service runs on. A '+' (plus sign) in the Reserved URL field represents localhost, which indicates the computer that you are working on.
5.In my Case, SOAP and OData web services in Microsoft Dynamics NAV use ports 7777 and 8888, respectively, and connect to a Microsoft Dynamics NAV Server instance named DEMO_NAVUSER.
The default reserved URL entries for these services are:
http://+:7777/DEMO_NAVUSER/ and http://+:8888/ DEMO_NAVUSER/.
OR
https://+:7777/DEMO_NAVUSER/ and https://+:8888/ DEMO_NAVUSER/.

6. We have to delete any entries that use the same port as the SOAP or OData web services. To delete an entry, below is the command format:
-----------------------------------------------------------------------------------------------
netsh http delete urlacl url=http://hostname:Port/NAVserver/
OR
netsh http delete urlacl url=https://hostname:Port/NAVserver/
-----------------------------------------------------------------------------------------------
7.In my case commands will be as its https NOT http–
* If you are using windows Authentication then it will be Http not Https.
-----------------------------------------------------------------------------------------------
netsh http delete urlacl url= https://+:7777/DEMO_NAVUSER/
netsh http delete urlacl url= https://+:8888/DEMO_NAVUSER/
-----------------------------------------------------------------------------------------------

8. To register the ports for the SOAP and OData web service with https, type the following command for each service:
-----------------------------------------------------------------------------------------------
netsh http add urlacl url=https://hostname:port/navserver user=DOMAIN\user
-----------------------------------------------------------------------------------------------
Option
|
Description
|
Hostname
|
The name of the
computer running Microsoft Dynamics NAV Server. Use
+ for localhost. |
Port
|
The port that is
used by the web service.
|
Navserver
|
The name of the
Microsoft Dynamics NAV Server instance to use with the web service.
|
DOMAIN\username
|
The domain and user
name of the service account for Microsoft Dynamics NAV Server. If the service
account for Microsoft Dynamics NAV Server is Network Service, then use "NT AUTHORITY\NETWORK SERVICE".
|
9. In My Case I will use below queries to register-
------------------------------------------------------------------------------------------------------
netsh http add urlacl url=https://+:7777/DEMO_NAVUSER user="NT AUTHORITY\NETWORK SERVICE"
netsh http add urlacl url=https://+:8888/DEMO_NAVUSER user="NT AUTHORITY\NETWORK SERVICE"
------------------------------------------------------------------------------------------------------

To configure the port to use the SSL certificate
1. At the command prompt, type the following command to view the current port configurations:
------------------------------------------------------------------------------------------------------
netsh http show sslcert
------------------------------------------------------------------------------------------------------
2. All port bindings to SSL certificates are listed. Each entry is indicated by the IP:port field, where IP is the IP address that uses the port (0.0.0.0 indicates all IP addresses) and port is the port number.
3. If SSL is already configured on the address and port that you want to use for SOAP or OData web services, then use the following command to delete the entry:
------------------------------------------------------------------------------------------------------
netsh http delete ssl ipport=ipaddress:port
------------------------------------------------------------------------------------------------------
4. In My case I will use below listed commands –
------------------------------------------------------------------------------------------------------
netsh http delete ssl ipport= 0.0.0.0:7777
netsh http delete ssl ipport= 0.0.0.0:8888
------------------------------------------------------------------------------------------------------
Both the Port were not bind till now as below are the execution results –


------------------------------------------------------------------------------------------------------
netsh http show sslcert
------------------------------------------------------------------------------------------------------
2. All port bindings to SSL certificates are listed. Each entry is indicated by the IP:port field, where IP is the IP address that uses the port (0.0.0.0 indicates all IP addresses) and port is the port number.
3. If SSL is already configured on the address and port that you want to use for SOAP or OData web services, then use the following command to delete the entry:
------------------------------------------------------------------------------------------------------
netsh http delete ssl ipport=ipaddress:port
------------------------------------------------------------------------------------------------------
4. In My case I will use below listed commands –
------------------------------------------------------------------------------------------------------
netsh http delete ssl ipport= 0.0.0.0:7777
netsh http delete ssl ipport= 0.0.0.0:8888
------------------------------------------------------------------------------------------------------
Both the Port were not bind till now as below are the execution results –

5. To bind an SSL certificate to the SOAP or OData web service port, use the following command format:
------------------------------------------------------------------------------------------------------
netsh http add sslcert ipport=ipaddress:port certhash=thumbprint appid={id}
------------------------------------------------------------------------------------------------------
Where –
Ipaddress
|
The IP address that
can use the web service. Use
0.0.0.0 to include all IP addresses. |
Port
|
The port that is
used by the web service.
|
Thumbprint
|
The certificate
thumbprint that you pasted to NotePad previously.
|
Id
|
A 32-digit
hexadecimal number that identifies the Microsoft Dynamics NAV application.
The id must be in the format {NNNNNNNN-NNNN-NNNN-NNNN-NNNNNNNNNNNN). If you
do not know the appid, then use any value, such as
{00112233-4455-6677-8899-AABBCCDDEEFF}.
|
6. In my case the command are
-------------------------------------------------------------------------------------------------------
netsh http add sslcert ipport=0.0.0.0:7777 certhash=0089ce78661e72c81213bbc6af77ca80ce0147a8 appid={00112233-4455-6677-8899-AABBCCDDEEFF}
-------------------------------------------------------------------------------------------------------
netsh http add sslcert ipport=0.0.0.0:7777 certhash=0089ce78661e72c81213bbc6af77ca80ce0147a8 appid={00112233-4455-6677-8899-AABBCCDDEEFF}
AND
netsh http add sslcert ipport=0.0.0.0:8888 certhash=0089ce78661e72c81213bbc6af77ca80ce0147a8 appid={00112233-4455-6677-8899-AABBCCDDEEFF}
------------------------------------------------------------------------------------------------------
------------------------------------------------------------------------------------------------------

Verifying the Configuration and Execute the Web Services
So let’s Restart the Service and create a Web Service and Test.
I will create a Web Service for Page 21 as shown below.

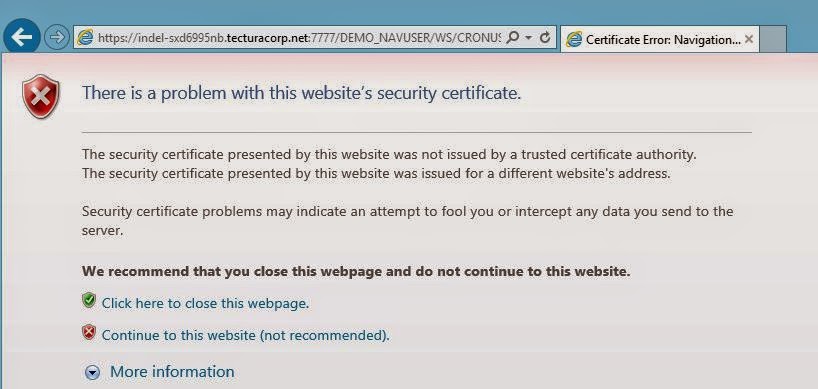
Let’s try to Run the SOAP or ODATA web Service. Here is what I get.

As I have not used Certificate with Qualified name, I am getting Security Warning message. As I click continue I will get the Username password Screen (Authentication is NAVUser Password).

As I click Enter after Providing Credential, when I tried to
move ahead, below is the page I was looking for.

Hope you find information in article Useful. I will try to come back asap with resolution on Security Certificate Warning.
If you would like to use the Certificate that are discussed in this article, then download the files from my SKYDRIVE.
File Name - NAV 2013 & NAV 2013 R2 - Web Services With Non Qualified SSL Certificate
"These postings are provided "AS IS" with no warranties and confer no rights. You assume all risk for your use."
Stay Tuned For More.
You comments and suggestions are welcome.
Regards,
Saurav Dhyani
Comments
Post a Comment